Alaskan Alpine Club
Below is the introduction to the ice towers, the ice tower contest prize info, the basic ice tower making instructions, and the story of the nozzles.
The Ice Tower projects, by John Reeves the ice artist.
Winters 2003-04, 2004-05, 2005-06, and 2007-08.
For those inquiring, the artist's email address is dredge2 at gci.net (substitute @ for at)
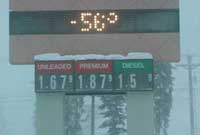
Why Fairbanks Alaska gets free ice.
The temperature in Fairbanks, 18 January 2004.
At that number, it don't matter whether it is Fahrenheit or Celsius.
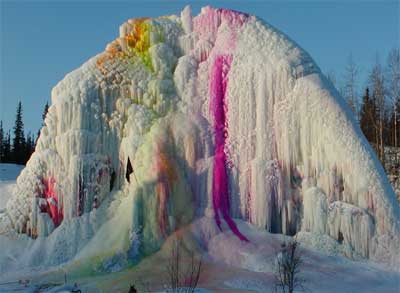
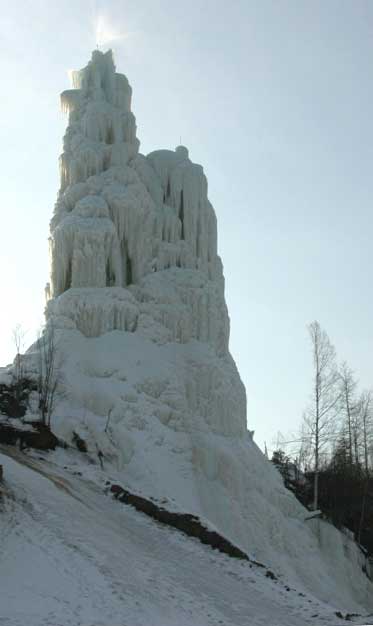
Foxman's Raven, Winter 2003-04, created by John Reeves.
What was it? A freeform ice sculpture, which, by chance, was climbable.
How was it made? By pumping water up through two pipes in the middle of the ice, out through a couple nozzles, 24 hours per day.
When was it started? October 2003.
How big did it get? 80 feet high, about 140 feet long and 40 feet wide near the base, and weighed about 45,000 tons, at its height on 5 April 2004.
Where was it? Just north of Fairbanks Alaska, south of Fox, beside the Steese Highway. You could not miss it.
How long did it last? Until 10 July 2004.
What was it supposed to be? Whatever you saw in it.
Why? For fun.
Ghost Raven, Winter 2004-05, created by John Reeves.
17 October 2004 to the final melt date of 20 July 2005, 1:11 PM.
This photo 4 February 2005.
This year the tower got to 152 feet high (46.3 meters).
You only have to be driving into Goldstream Valley, at its upstream end by Fox, just over the hill north of Fairbanks, in the dark of winter, and suddenly see this huge, free standing tower of white and blue ice, or whatever it might be, glowing in floodlights, unlike anything you have ever imagined, which was not there the last time you went to Fox a few months ago. You would look at your speedometer, check for any open containers, look for cops, slow down, and wonder if you were the only one it town to have seen what you just saw, or if you were the last one to find out.
A lot of stories got created, some of them true.
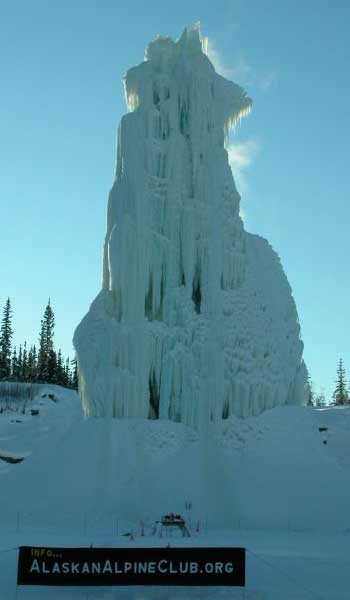
Twin Towers, Winter 2005-06, created by John Reeves.
11 October 2005 to 30 July 2006, 2:21 PM.
This photo 11 December 2005.
Built on top of the bluff, 70 feet above the ground down beside the highway.
Seen from the roads behind them, they are looming up out of the forest.
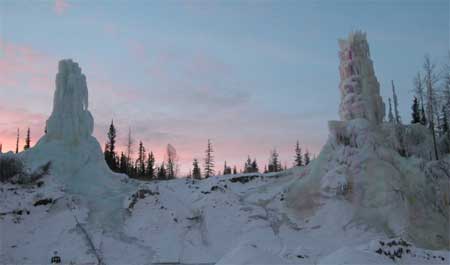
The Casstle Tower of Winter 2007-08, by John Reeves.
Built on the bluff just to the right of the north tower two winters ago.
No ice sculpture was built during the winter of 2006-07, for some excuse.
07-08 Ice Tower1, and subsequent pages.
Ice Towers Contest Prize...
To encourage more people to do fun things that are harmless and still legal, until the government outlaws fun, the prestigious Alaskan Alpine Club will offer an annual prize, however currently paltry, of 100 dollars, for each of two categories of human made ice towers made from flowing water, anywhere in the northern half of the world. Other world entries will be accepted and given preference.
This is a northern hemisphere thing. The prize will be awarded about mid summer when the Club Board figures that no more water is freezing in the far frozen north. One hundred US dollars will be transferred by check or wire transfer to the winner. The contestants must submit some photos of their ice tower, preferably by email or website display, with a description of it, an accurate measurement, metric, English or anything easily convertible, and the name of the person who will verify the story if somebody asks around to make sure it really existed. The height of the tower must be measured from the level ground where the source of the water starts the vertical vector, to the highest piece if ice. Anyone is eligible, from individuals of questionable character, to organizations, companies or governments of whatever character they wish to claim, except John Reeves of Fairbanks Alaska, and the city of Lycksele Sweden who are already setting the standard. We will even pay the National Park Service pigs if they make the highest ice tower and admit to whose money they used. We want to pay the money, despite our abject poverty, so you may be the winner even if you were only standing on the edge of the deck on cold days and, ah, never mind.
The rules, which are what you are reading, preclude the water source starting at or near the top of the vertical vector, and flowing down a cliff or other rock or dirt feature. The water source must start its human modification from the vicinity of the base of the ice tower.
Ice towers made on a tree or pole will be classified in the supported category until they completely cover the tree or pole and thus imperil the tree or pole if they collapse from their weight.
Hey you Russians stationed on the Russian North Pole Ice Research (military) Station, the only way you could not win is if you do not get this message or if you are drinking so much vodka that you just laughed at the idea.
The 100 dollars should just about cover your time and expenses to send us the photos and information, which we will put on our Other Ice Towers page.
Free Standing Ice Tower category: The highest human made ice tower made from water flowing from a pipe or supported pipe that will not significantly contribute to the strength of the tower.
Supported Ice Tower or Wall category: The highest human made ice tower or ice wall made from water flowing vertically down from, and along, a human-made structure, from the top to the first horizontal vector of ground or human made structure.
All decisions related to any variables or perceptions of variables are exclusively those of the prestigious Alaskan Alpine Club Board of Directors who may also be judging the fine wine and cigar contests at the same time.
Verification preference will be given to those who keep us updated with emailed photos of the ice tower in progress. Email: climb at AlaskanAlpineClub.org (substitute @ for at).
Basic instructions for making ice towers ......
It is a new game, so what you learn is more than the other guy knows. Let us know what you learn, and we will post it. The following are just a few random considerations to get you conveniently started.
Mix random parts of water and freezing air.
Run a garden hose or plastic pipe from the water source to your ice tower. Always lay the line out on a steady gradient, so that you can conveniently drain the entire line at any time, so it does not turn into a tube of ice if something goes awry. Insulate the line if it involves a long distance. The new type of plastic pipe will not break if water freezes in it. A 3/4 inch diameter line is adequate.
Run the hose or line up to the point where you are going to dribble the water down over a constructed wall or a tree trunk. Or, if you are making a free standing tower, connect the hose into a supported 10 foot or higher vertical steel pipe with a shower head at the top. Always have a bypass valve or hose connection well away from what is going to be covered with ice. The ice will reach farther than you first guess. Plan what part of the line will be inside the ice for the duration, without any loops that can retain water that will freeze if you turn off the water and drain the line.
If your are making a free standing tower, make sure the vertical pipe is solid against the ground, because it must sustain the full weight of the pipe you add above it. Tie it in solid to something, to sustain the tightening of each next section of pipe. Some of the water will always run down along the pipe to keep it separate from the ice, so its only solid connection will be at the bottom. You might wire each new pipe section into the ice so it has better support.
If your design involves adding sections of pipe as the tower grows, tighten the pipe sections with a pipe wrench, but only hand tighten the nozzle or shower head at the top, so it is easy to get off each time.
Do not use trees that you do not want to be broken off by the weight of the ice. The ice gets heavier than you imagine. If there is wind in the area, the ice will form a lopsided weight at the top of the tower, and break what it is formed on unless it is structurally reinforced.
Do whatever you must to be able to conveniently turn the water on during the cold night, and off during the sunny, warm part of the day, and drain the entire line when you turn off the water.
You can also stand off to the side and spray your structure with water, to either make the entire structure if you have patience, or to fill in areas.
Add colored dye to the water on occasion, for interest. Put a small floodlight on it at night, to impress the neighbors. Send us photos. Buy new climbing equipment from whomever sponsors our website, if we can get a sponsor. Every climber in the country wants the climbing equipment companies to sponsor their wild assed climbing ideas.
Plan for the water run-off from the melting ice in the spring, preferably not into your neighbor's basement, unless he works for the Park Service.
That is it. If we knew any more, we would not have made so many mistakes.
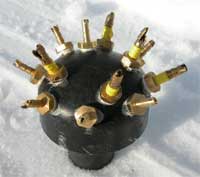
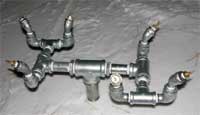 The nozzles and their story:
This was a low budget, lack of knowledge adventure. We
could not find anyone with the knowledge, so we had to invent
our own. We had free water and free freezing air. Nozzle heads
designed to create ice towers are not yet on the market. We learned
from the process, which cost a lot of money buying a lot of parts
that required a lot of time to put together, modify and keep trying.
The photos below show some of the several stages, starting with
the first design that worked rather poorly. We were working with
both 1 inch and 3/4 inch pipe water sources. We started with pipe
fittings, and brass hose barbs that we variously cut, hammered,
mangled and drilled. The goal was to get the proper spray pattern,
in a gradient from a close mist to build the center column, extending
to a farther reaching stream of water to build wings or arms of
structural ice. A mist freezes quickly, but therefore creates
a cap of ice over the water flow, causing the water to run down
the side of the pipe, reducing the effect for building a tower,
or requiring shorter intervals between breaking the ice from around
the nozzle head. The solid streams do not freeze until the ends
of the streams reach the ground or ice mound, and mostly flow
away. The object was to create the optimum gradient. We found
that each solid stream would maintain an opening in the cap of
ice made by the mist, with the gradient of spray creating an extending
pattern of ice, with icicles. The commercial shower head type,
public fountain nozzle arrays
The nozzles and their story:
This was a low budget, lack of knowledge adventure. We
could not find anyone with the knowledge, so we had to invent
our own. We had free water and free freezing air. Nozzle heads
designed to create ice towers are not yet on the market. We learned
from the process, which cost a lot of money buying a lot of parts
that required a lot of time to put together, modify and keep trying.
The photos below show some of the several stages, starting with
the first design that worked rather poorly. We were working with
both 1 inch and 3/4 inch pipe water sources. We started with pipe
fittings, and brass hose barbs that we variously cut, hammered,
mangled and drilled. The goal was to get the proper spray pattern,
in a gradient from a close mist to build the center column, extending
to a farther reaching stream of water to build wings or arms of
structural ice. A mist freezes quickly, but therefore creates
a cap of ice over the water flow, causing the water to run down
the side of the pipe, reducing the effect for building a tower,
or requiring shorter intervals between breaking the ice from around
the nozzle head. The solid streams do not freeze until the ends
of the streams reach the ground or ice mound, and mostly flow
away. The object was to create the optimum gradient. We found
that each solid stream would maintain an opening in the cap of
ice made by the mist, with the gradient of spray creating an extending
pattern of ice, with icicles. The commercial shower head type,
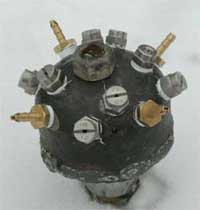
public fountain nozzle arrays 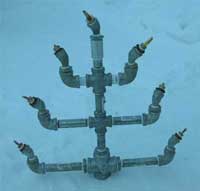
 than
a gradient, but a combination of spray and solid stream nozzles
may work. We dinged the holes a bit to create an irregular flow.
The cheap brass hose barbs ($1.40 each at the hardware store)
proved to be the most versatile nozzle. They are 1/4 inch NPT
threads, with a barb to fit a 3/16 inch inside diameter hose.
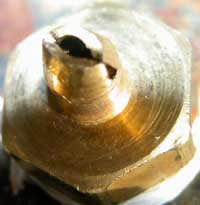
The best modification, so far, is pictured in the last photo.
We cut off half the barb, hack-sawed a cross-slot, and pounded
the two sides together a bit. It makes a lateral mist, and a central
stream. Our current nozzle head involves 8 brass hose barbs and
4 narrow spray commercial spray nozzles.
than
a gradient, but a combination of spray and solid stream nozzles
may work. We dinged the holes a bit to create an irregular flow.
The cheap brass hose barbs ($1.40 each at the hardware store)
proved to be the most versatile nozzle. They are 1/4 inch NPT
threads, with a barb to fit a 3/16 inch inside diameter hose.
The best modification, so far, is pictured in the last photo.
We cut off half the barb, hack-sawed a cross-slot, and pounded
the two sides together a bit. It makes a lateral mist, and a central
stream. Our current nozzle head involves 8 brass hose barbs and
4 narrow spray commercial spray nozzles.
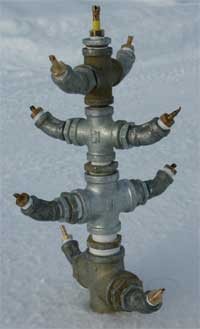
The nozzle head is put at the top end of ordinary steel pipe, which is extended upward with pipe sections (5 or 10 foot long), as the ice builds. We made an extra nozzle head to make it convenient when adding each next section. Because heavy, lop-sided ice built up on the head a couple times, and a wind then broke the pipe off at the lower junction, we wire the middle of the pipe to three or four points on the ice each time. Ice quickly builds on the wire, to make the pipe even more structural. We insulated the pipe (or hose) going from the well to the base of the ice towers, but left it uninsulated inside the ice towers. The flow of water and the surrounding ice seem to prevent the water in the vertical pipe from freezing. Sometimes the nozzle head must be chopped out of hard ice around it, and sometimes it is in an open cavity created by a surrounding ice cap. Secure the base of the first pipe well, because each pipe section will be tightened against it, and it will accumulate the weight of the pipe column.
This particular endeavor is predicated on spraying water into the air, to build ice on itself. Another technique involves dribbling slow flowing water out over a surface, which builds a different form of ice, sometimes more quickly depending upon the available surface.
You may ask any questions. Please send us descriptions of your ice tower and ice wall endeavors, for posting at this website, to assist others who might be so foolish as to squander their time in pursuit of knowledge, fun and the advancement of constructive human abilities, while certain idiot power craving national leaders therefore become more enraged at their citizens who do not work harder to support the government's malicious police and military empires, much to the amusement of observers.
And that is the story until more story is told.
Carved ice art in Fairbanks Alaska IceAlaska.com.
Climbing Taxes
The Club
Climbing Concepts 1
Climbing Concepts 2
Climbing Concepts 3
Club Museum
Gullible Climbers
Member Number
Mountain Rescue Fund
Wilderness Classic Race
National Park Service
Posters and Calendars
Posters 2
Photos
Events
Ice Towers Web Cam
03-04 Ice Tower
04-05 Ice Tower
05-06 Ice Tower
07-08 Ice Tower1
07-08 Ice Tower2
07-08 Ice Tower3
07-08 Ice Tower4
07-08 Ice Tower5
07-08 Ice Tower6
07-08 Ice Tower7
07-08 Ice Tower8
Other Ice Towers
Links
Home